Porsche 911 UK Enthusiasts Online Community Discussion Forum GB

Welcome to the @Porsche911UK website. Register a free account today to become a member! Sign up is quick and easy, then you can view, participate in topics and posts across the site that covers all things Porsche.

Already registered and looking to recovery your account, select 'login in' and then the 'forget your password' option.

Front ducts

I think the turbo S ducts are supposed to give extra airflow to both the oil cooler and air con condenser which are located on either side of front bumper.

The other ducts are brake ducts and so the pipework channels air to the front brakes. They also retain both the fog light and sidelight with both housed in the lens section. One side is supposed to be harder to fit then the other ie running the additional pipework past either the oil cooler or condenser (I forget which) I think there is a right up on installing these on here somewhere.
I can't say I've experienced enough brake fade in road use to worry about brake ducts so went for the simple turbo s ducts with the hopefully added advantage of additional oil cooling (although I did not have a problem with oil overheating either lol )
 
jonttt said:
cambjones said:
They do.. the £100 ones come with the LED units See here

I just wondered if these were the best LED units to use or if there were others, better, out there... Seems with LEDs there is a bit of variety in quality.

They look a different LED unit to mine. Mine are great when turned on but the problem was you could see the yellow circuit board when mot on so I ended up fitting a black masking film to hide the yellow.

If those are as bright you would not need the film.

Might be worth you reading my exploits with them. Ps they are really easy to paint yourself.

http://911uk.com/viewtopic.php?t=82158&postdays=0&postorder=asc&start=207

Thanks Jontttttt...

Yeah that was my concern, the LEDs that come with it wont be the best ones... but I won't know which ones to get... I might just get it and see how it goes...
 
:thumb:

Some people have to sacrifice themselves for the greater good :D
 
Ordered...

I'm going to try and paint them myself. I've not gotten any experience here so will be interesting.

Now the hardest part, finding the time.
 
As someone on here pointed out, you just need to buy a few spade connectors to plug the LEDs into the leeds from the car.

I have no idea how good the LEDs that Type911 provide are however Matt said he has not had any unhappy customers so he thought they were good. They come in a HELLA box. Type911 has a pretty good reputation, I think Matt owns a 993 too, so I'll report back when I get around to painting and installing?

Any recommendation for the best online paint shop to get all the bits and bobs from?

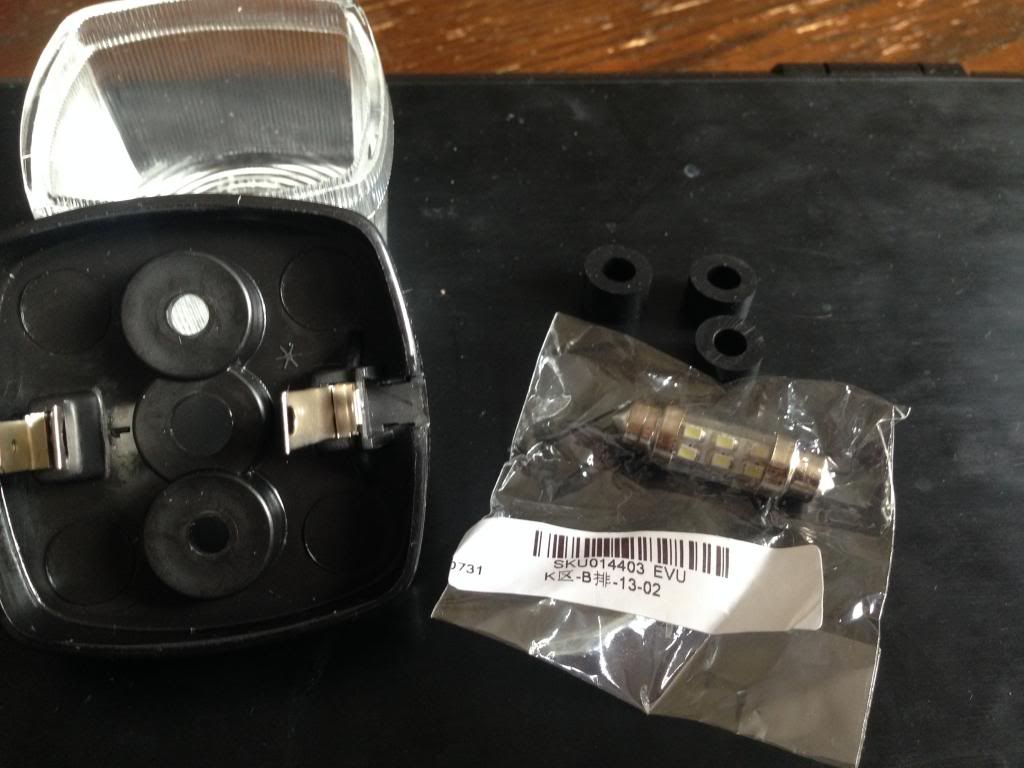
Here is what you get in box. Jonttt they look like slightly different LEDs to the ones you have.

 
I picked them up yesterday as well. Same kit. I will source primer paint and lacquer today. Paints for you was the recommendation
 
Red993C4 said:
I can see this thread causing a run on these parts. :D

Well I just ordered a set off Ebay and some paint from Paints4U :D
 
I use a paint shop in Liverpool which is 5 min from my office. Any internet paint supplier should be ok just give them the porsche paint code.
 
jd2 said:
Red993C4 said:
I can see this thread causing a run on these parts. :D

Well I just ordered a set off Ebay and some paint from Paints4U :D

I feel like we should do a group painting class :p

Thanks for the tips on paint supplier... I actually found I've used Paints4U before, when I did the 993 Chassis Legs... not sure how that slipped my mind.

So from Dom's email this is what you need for a DIY

"use a good primer and laquer, flat it with wet and dry between coats and use a tack cloth when appropriate then you will be able to obtain a finish that will be unnoticeable from a job done in a booth."

Last time I got the following (2011)
1. (BSB 3AZ) OCEANBLAU (£11.99)
1. Power Can Clear Coat Lacquer Upol A/sol (£5.50)

so I just need to add the primer to a similar order.

Dom/Jontt, a few questions for you if you don't mind...
1. Can you remember if you needed 2 cans of the colour mix or more?
2. How many coats of primer, colour, clear lacquer did you apply?
3. What grade wet/dry paper did you use. did you go through 600, 800, 1,200?

I assume the 'tack cloth' just to clean up the surface right before apply a coat of paint?

Can you tell I'm excited about doing this, nothing like expanding your skills.

Cheers.
 
To be honest with such a small part I would not bother cutting the primer or paint back if you can do them all in one session.

Ie wet and dry with 800 or 1000 then tack cloth dry / clean in preparation nb meth spirit will do the same job important thing is no dirt dust or grease and surface keyed slightly for primer to stick.

Find a nice dry dust free place and prime the rear c3 light coats until touch dry then turn over and do the fronts ie 10 min between coats to touch dry. Then turn over again and colour paint again 3-4 coats can be slightly tacky between coats but leave the last longer to touch dry and turn over to front and repeat. Make sure touch dry before turning to add the final lacquer layers 3-4 light layers again.

Nb if not a well ventilated space get a disposable face mask (they are not expensive), damp it and wear it for each paint. The fumes are toxic and you will have a bad throat for a few days if you don't. Against the paint supplier will have these.

If you do all this in one session in a dust free area you should not need to cut back with wet n dry.

Leave for at least 24 hours and then cut the lacquer back with a polish and then wax up. That should give you a nice shiney lacquer finish.

Nb use card to paint on as newspaper can stick too easily. The hardest bit is getting the layers thin / thick enough and even. Start the spray past the part and sweep past back and forth never turning over the part. Clear the nozzle often as they easily clog.

Remember if you ***** it up you can easily rub down and start again ie these are perfect size parts to experiment with.

A made up can will have much more paint than you average halfords / OEM pre made can so one can will be more than enough for the job. Get the lacquer from thg same supplier as they usually sell the better anti scratch stuff for no extra premium as they buy it in bulk.

Happy spraying. Just find a day you can take your time and go back to it every 10 min over a few hours.
 
Jonttt,

That is just the kind of advice I needed, many thanks!

Like you said, nice small parts to sharpen up my skills.

Cheers

Highway, jd2... 'Show and Tell' when we are all done :)

Who else is doing this?
 
I have ordered the bits now as well. Famous last words...How hard can it be?
 
jonttt said:
lots of useful advice.....

Many thanks, will be my first attempt so appreciate the advice. :)
 

New Threads

Forum statistics

Threads
124,594
Messages
1,441,940
Members
49,026
Latest member
WilmslowSi
Back
Top