Porsche 911 UK Enthusiasts Online Community Discussion Forum GB
Welcome to the @Porsche911UK website. Register a free account today to become a member! Sign up is quick and easy, then you can view, participate in topics and posts across the site that covers all things Porsche.
Already registered and looking to recovery your account, select 'login in' and then the 'forget your password' option.
You are using an out of date browser. It may not display this or other websites correctly.
You should upgrade or use an alternative browser.
You should upgrade or use an alternative browser.
My 996 turbo, the story so far.....
- Thread starter DW 996turbo
- Start date
Diggermeister
Hockenheim
- Joined
- 26 May 2015
- Messages
- 663
Those front vents do look fantastic and are the sort of thing that if I decide to keep my 996tt as a 'forever' car, will be on the to do list.
I do also like the 997.2 GT3 style bumper vents. If you could get these done too and post up a how to I'd be most grateful.

I do also like the 997.2 GT3 style bumper vents. If you could get these done too and post up a how to I'd be most grateful.

I like seeing your thread updated, I get a bit excited actually, as you are one of a handful of people at the moment that post's about mod's/upgrades to your car. Rather then prices, prices going up, past prices, depreciation, etc :sad:
I don't like that one though, sorry
But saying that, it looks better than Porsche's attempt at it on the GT3's!!!
Keep the mods coming :thumb:
I don't like that one though, sorry
But saying that, it looks better than Porsche's attempt at it on the GT3's!!!
Keep the mods coming :thumb:
DW 996turbo
Trainee
- Joined
- 23 Jul 2017
- Messages
- 77
Diggermeister - Thanks very much mate. I did give some serious consideration to doing the same sort of thing to the rear. I don't think it would fit in with the ideas I've got for the rear bumper though. I'll let you know if I change my mind.
HSC911 - Cheers again mate. No worries on the front vents, I'm just glad your enjoying the updates. I'll keep them coming as long as I can.
HSC911 - Cheers again mate. No worries on the front vents, I'm just glad your enjoying the updates. I'll keep them coming as long as I can.
DW 996turbo
Trainee
- Joined
- 23 Jul 2017
- Messages
- 77
After being introduced to the idea of carbon skinning by a friend, I was feeling brave and decided to order one of the starter kits from a company called Carbonmods. The kit has everything you would need, in theory, to create a small number of carbon fibre covered parts. After watching their YouTube videos and reading through the instructions several times, I chose a few small and, more importantly, flat interior pieces to start working on.
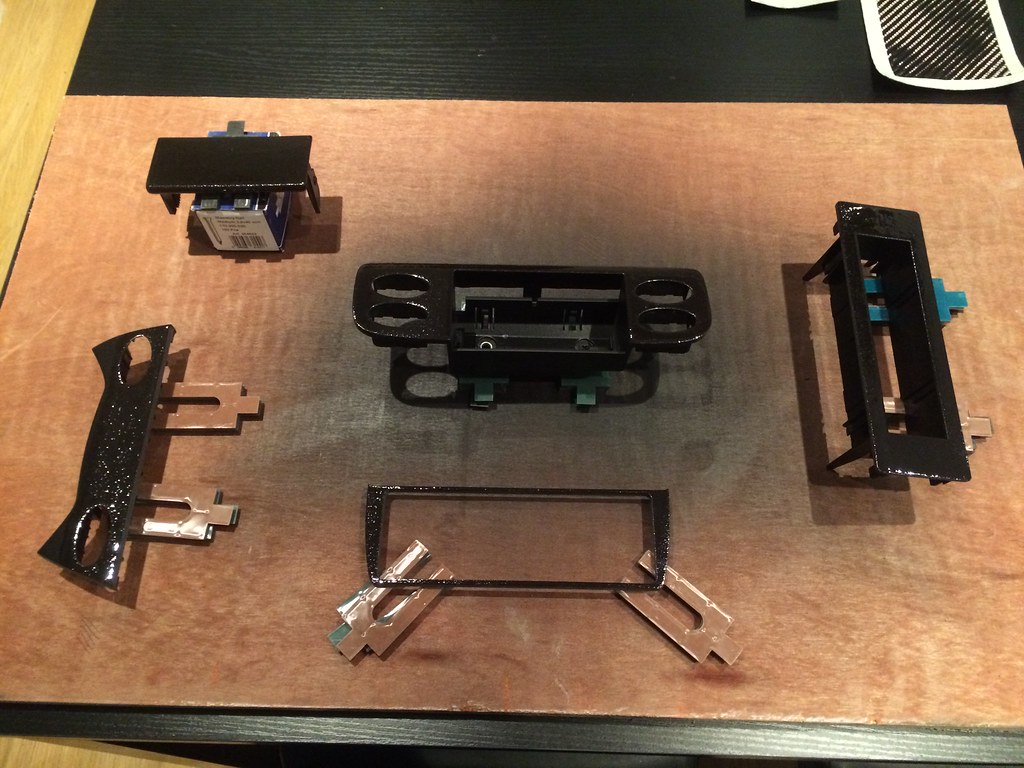
The process looks and sounds fairly simple, but then, they always do. The first step is to sand the parts with 120 grit wet and dry paper and then apply a thin layer of the black epoxy resin base coat.
 Untitled by Dave W, on Flickr
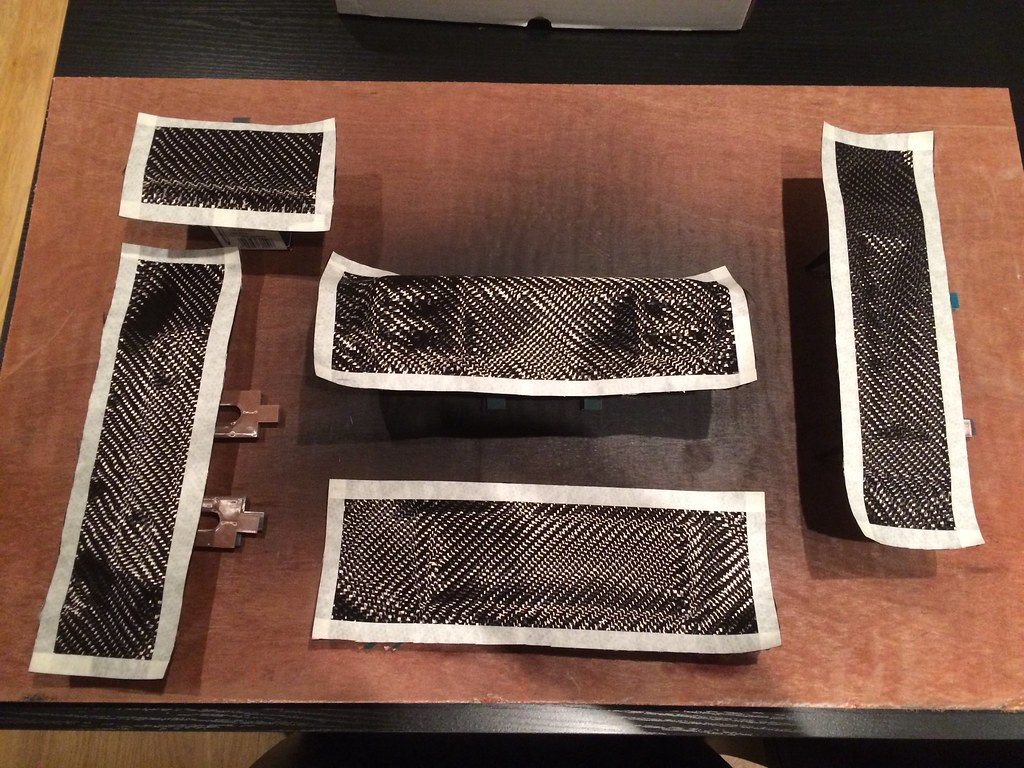
As it becomes tacky, that base coat then allows the carbon fibre to stick to the part. This was by far the most awkward stage to get right. You only really get one shot at it and the carbon weave seems to want to distort if you even consider touching it, let alone as you try to carefully wrap it around the shapes of the part. It takes a lot of patience to get everything to line up nicely, but after a lot of time and a lot of swearing, I was satisfied that I'd got the weave lined up nicely.
 Untitled by Dave W, on Flickr
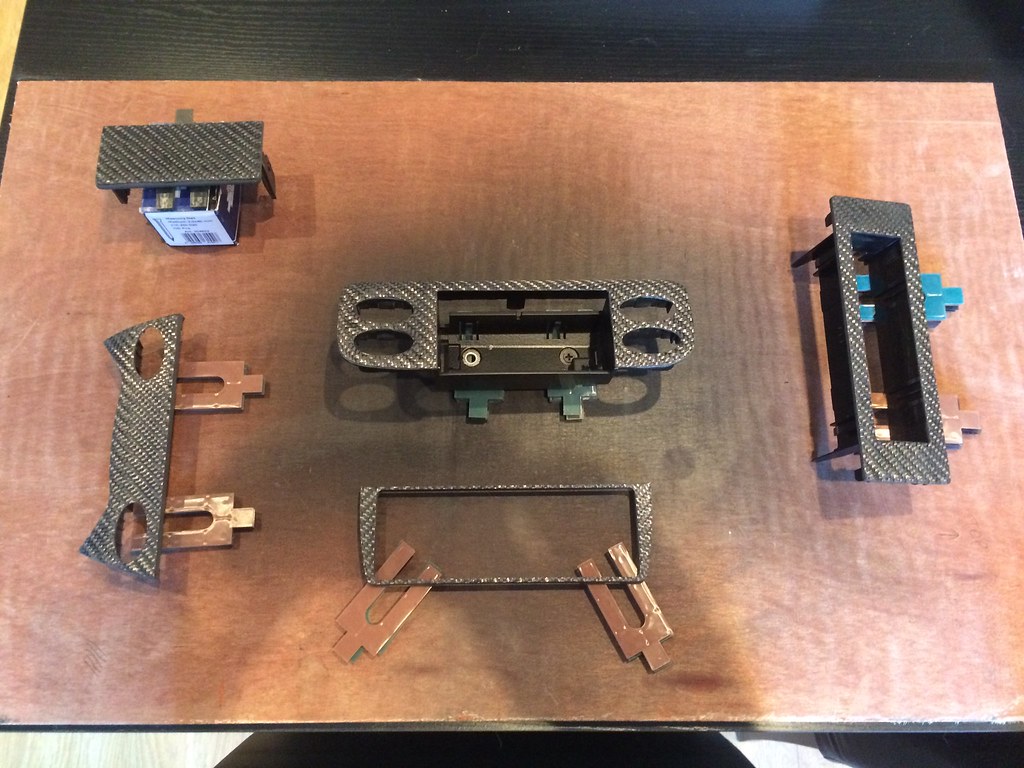
You then need to apply the first layer of clear epoxy resin to bond the carbon to the base coat and the part itself. Once this coat of resin is dry, it's time to trim the extra carbon around the part to clean up the edges. I was surprised at how solid such a thin sheet of carbon had become with just one layer of resin on top. The problem with that though was that, while trimming, the carbon seemed to break off into tiny, razor sharp needles. Carbon fibre splinters in your fingers are great. :thumb:
Once the parts were trimmed, this was the first time I got to see how everything actually lined up from piece to piece. I'd chosen parts that would sit next to each other in the car, so I was keen to have the weave lining up nicely. Thankfully, I was able to breathe a sigh of relief as they all seemed to line up ok.
 Untitled by Dave W, on Flickr
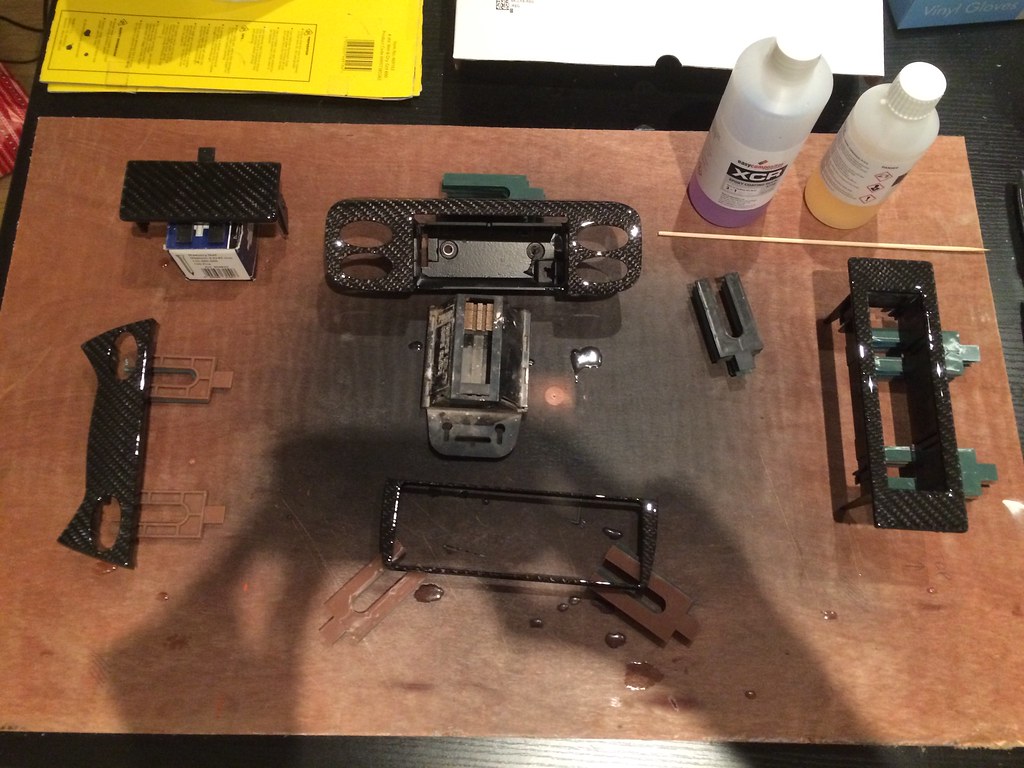
After a quick scuff up of the surface to get the next few layers to adhere properly, it was time to build up some layers of clear epoxy to get that deep gloss finish. This was when the parts started to take shape.
 Untitled by Dave W, on Flickr
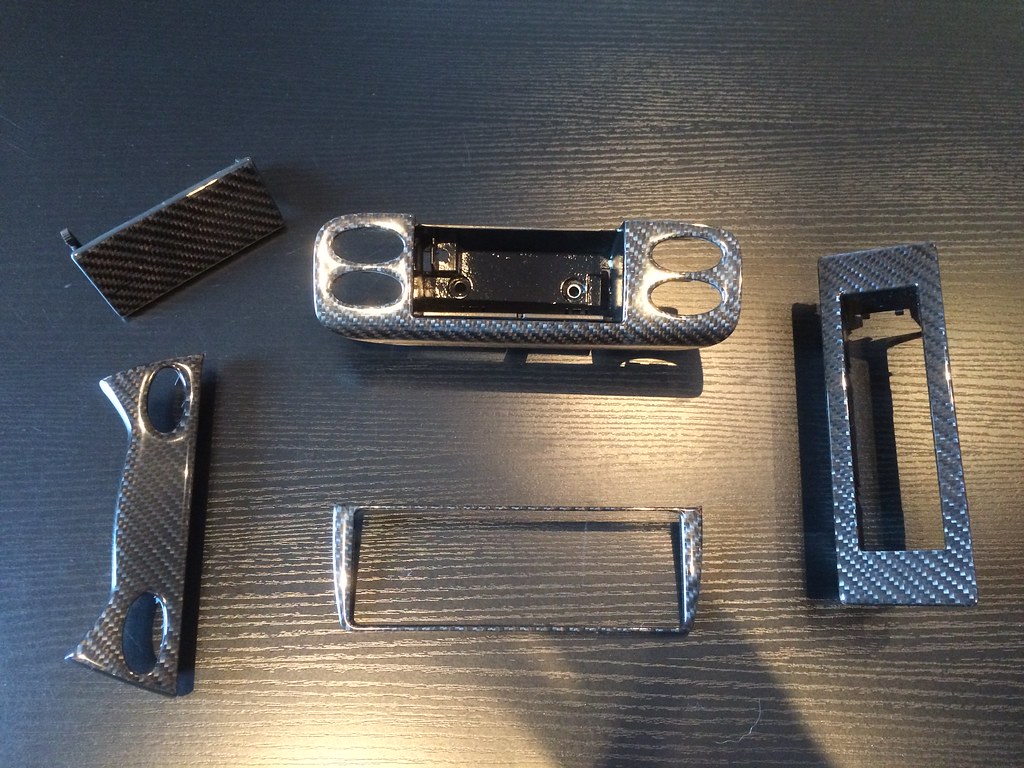
After about 4 more layers of the clear epoxy I managed to sand the surface to a nice smooth and even finish with 400 grit wet and dry. You then need to work through the various grades to refine the finish before either polishing or lacquering the parts to get that gloss finish. I chose to lacquer the parts after finishing with the 1200 grit wet and dry paper. Once the lacquer had dried I gave it a light going over with 2000 grit and then polished them by hand until I was happy with the finish.
 Untitled by Dave W, on Flickr
This was the parts all finished and waiting to go back in the car.
The process looks and sounds fairly simple, but then, they always do. The first step is to sand the parts with 120 grit wet and dry paper and then apply a thin layer of the black epoxy resin base coat.
 Untitled by Dave W, on Flickr
As it becomes tacky, that base coat then allows the carbon fibre to stick to the part. This was by far the most awkward stage to get right. You only really get one shot at it and the carbon weave seems to want to distort if you even consider touching it, let alone as you try to carefully wrap it around the shapes of the part. It takes a lot of patience to get everything to line up nicely, but after a lot of time and a lot of swearing, I was satisfied that I'd got the weave lined up nicely.
 Untitled by Dave W, on Flickr
You then need to apply the first layer of clear epoxy resin to bond the carbon to the base coat and the part itself. Once this coat of resin is dry, it's time to trim the extra carbon around the part to clean up the edges. I was surprised at how solid such a thin sheet of carbon had become with just one layer of resin on top. The problem with that though was that, while trimming, the carbon seemed to break off into tiny, razor sharp needles. Carbon fibre splinters in your fingers are great. :thumb:
Once the parts were trimmed, this was the first time I got to see how everything actually lined up from piece to piece. I'd chosen parts that would sit next to each other in the car, so I was keen to have the weave lining up nicely. Thankfully, I was able to breathe a sigh of relief as they all seemed to line up ok.
 Untitled by Dave W, on Flickr
After a quick scuff up of the surface to get the next few layers to adhere properly, it was time to build up some layers of clear epoxy to get that deep gloss finish. This was when the parts started to take shape.
 Untitled by Dave W, on Flickr
After about 4 more layers of the clear epoxy I managed to sand the surface to a nice smooth and even finish with 400 grit wet and dry. You then need to work through the various grades to refine the finish before either polishing or lacquering the parts to get that gloss finish. I chose to lacquer the parts after finishing with the 1200 grit wet and dry paper. Once the lacquer had dried I gave it a light going over with 2000 grit and then polished them by hand until I was happy with the finish.
 Untitled by Dave W, on Flickr
This was the parts all finished and waiting to go back in the car.
DW 996turbo
Trainee
- Joined
- 23 Jul 2017
- Messages
- 77
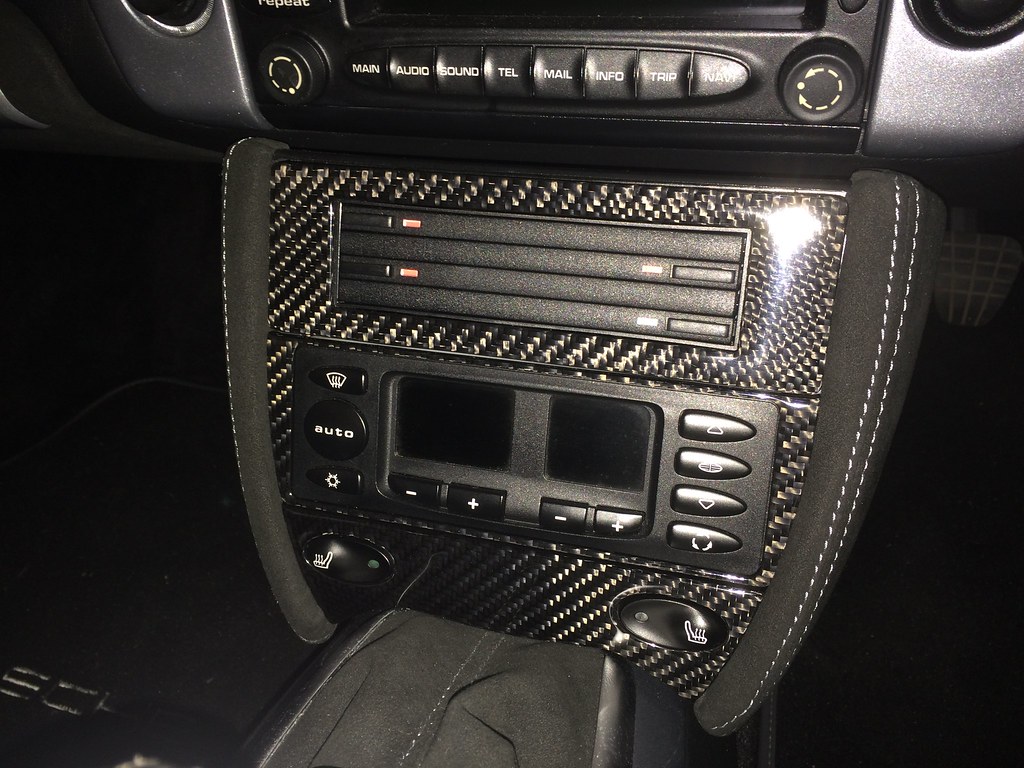
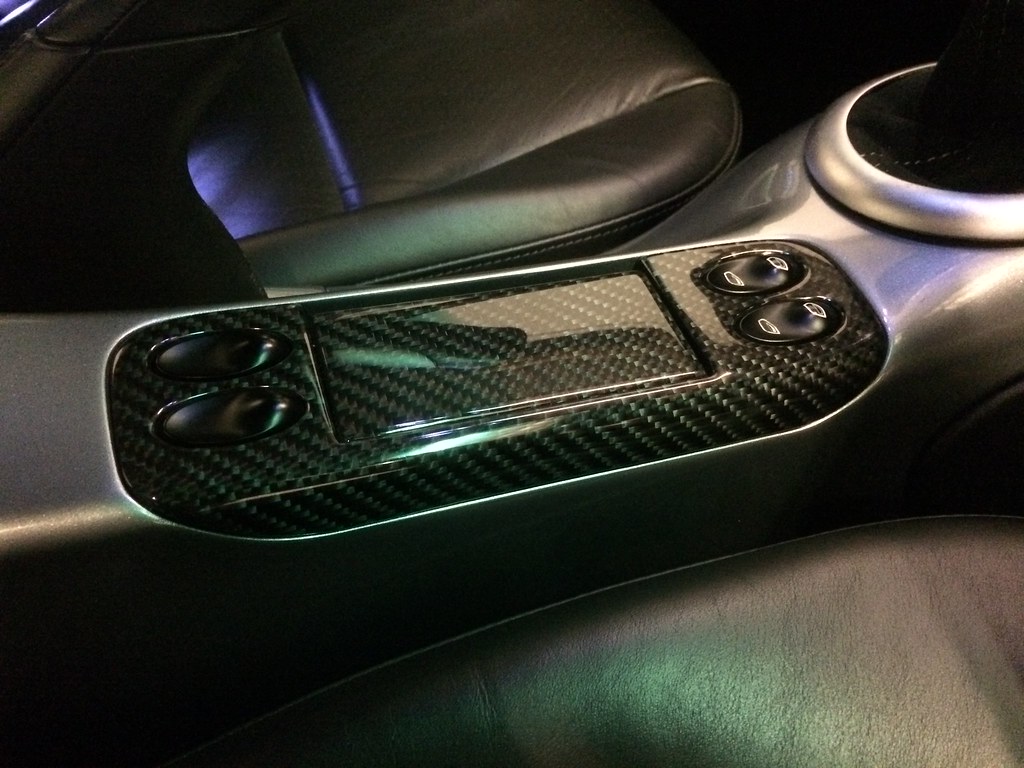
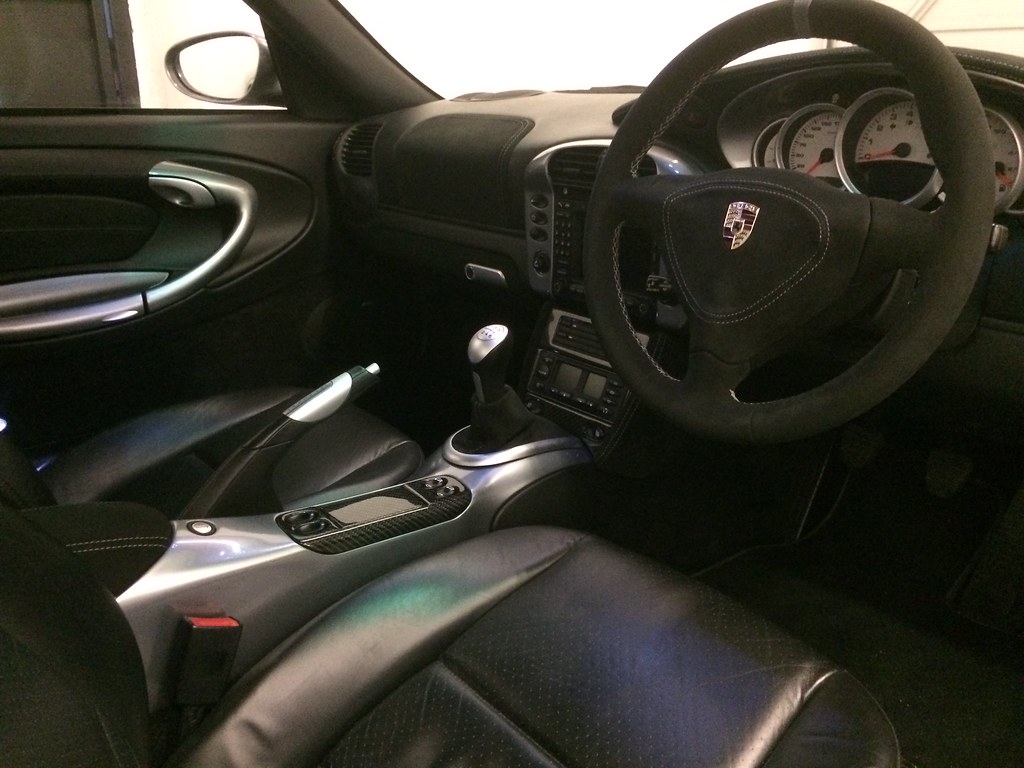
All fitted back in the car.
 Untitled by Dave W, on Flickr
 Untitled by Dave W, on Flickr
 Untitled by Dave W, on Flickr
It all went back together without any problems, despite the extra thickness from the epoxy resin. I'm very happy with the results. The only problem was that I now needed a bit more carbon fibre to balance out the centre console.
 Untitled by Dave W, on Flickr
 Untitled by Dave W, on Flickr
 Untitled by Dave W, on Flickr
It all went back together without any problems, despite the extra thickness from the epoxy resin. I'm very happy with the results. The only problem was that I now needed a bit more carbon fibre to balance out the centre console.
Jonathon555
Suzuka
- Joined
- 4 May 2014
- Messages
- 1,081
Liking this thread , some nice mods.
Be careful not to turn it into a GT3RS street eBay conversion
Be careful not to turn it into a GT3RS street eBay conversion
DW 996turbo
Trainee
- Joined
- 23 Jul 2017
- Messages
- 77
Jonathon555 - Thanks very much, glad you're enjoying the thread.
I know what you mean though, there's a really fine line sometimes between tastefully modified and going too far. I'll hopefully be able to stay on the right side of that line, but I'm sure a lot of people may think it's already too late. :thumb:
I know what you mean though, there's a really fine line sometimes between tastefully modified and going too far. I'll hopefully be able to stay on the right side of that line, but I'm sure a lot of people may think it's already too late. :thumb:
DW 996turbo
Trainee
- Joined
- 23 Jul 2017
- Messages
- 77
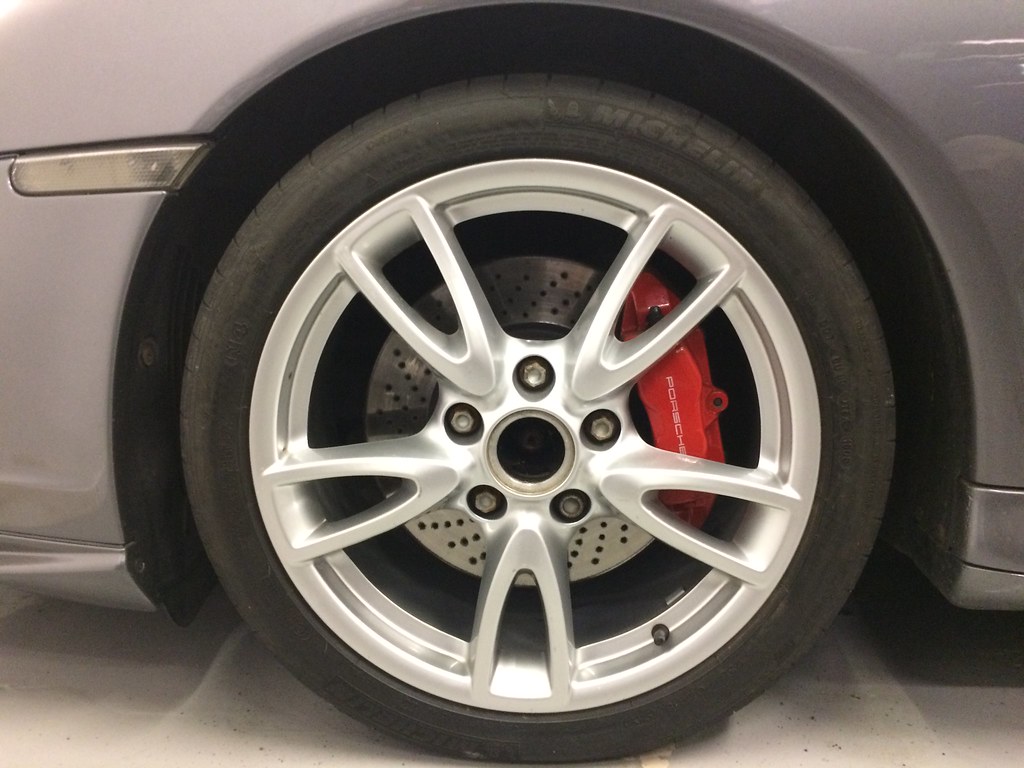
As my car was becoming more and more modified, I felt the wheels were now in need of a change as well. I'm a fan of the standard wheels, but didn't feel they would fit in with the overall look I was trying to achieve. I wanted to stick with 18" wheels instead of increasing to 19". I prefer the look of 19" wheels, but love the way the car rides and handles and didn't want to do anything that might change that.
The wheels I decided upon are actually sold as winter wheels for the 997 and came as standard on the 997.2 Carrera if 19" wheels weren't ticked as an option. I hadn't considered these wheels until seeing a set for sale on eBay. They remind me slightly of the wheels fitted to the 997.2 GT3, although admittedly not as good looking. I'd not seen a set of these wheels fitted to a 996 turbo before so was a bit unsure. However, I decided to go for them and had them powder coated at the 'Wheel Specialist' in the same gunmetal colour that my standard wheels had been finished in.
 Untitled by Dave W, on Flickr
 Untitled by Dave W, on Flickr
 Untitled by Dave W, on Flickr
 by Dave W, on Flickr
 Untitled by Dave W, on Flickr
 by Dave W, on Flickr
They were originally from a 997 C4S so had wider rears with widebody offsets closer to the standard 996 turbo rears. I didn't initially want to fit spacers, but ended up needing them to achieve the look I wanted as the offsets were slightly higher than the originals so they would sit a little further inside the arches. They are 18 x 8 ET57 fronts and 18 x 11 ET51 rears.
In the end I fitted 15mm spacers to the front and 20mm to the rear. This gave me the equivalent of fitting 8mm spacers to the front and 14mm to the rears over the standard wheels. The spacers were from a company called Bimecc. They seem like really good quality items, and now they're fitted, the car drives and feels the same as before with no negative effects that I can detect. The wheels now sit in the arches where I'd like them to and I'm very happy with the new look.
The wheels I decided upon are actually sold as winter wheels for the 997 and came as standard on the 997.2 Carrera if 19" wheels weren't ticked as an option. I hadn't considered these wheels until seeing a set for sale on eBay. They remind me slightly of the wheels fitted to the 997.2 GT3, although admittedly not as good looking. I'd not seen a set of these wheels fitted to a 996 turbo before so was a bit unsure. However, I decided to go for them and had them powder coated at the 'Wheel Specialist' in the same gunmetal colour that my standard wheels had been finished in.
 Untitled by Dave W, on Flickr
 Untitled by Dave W, on Flickr
 Untitled by Dave W, on Flickr
 by Dave W, on Flickr
 Untitled by Dave W, on Flickr
 by Dave W, on Flickr
They were originally from a 997 C4S so had wider rears with widebody offsets closer to the standard 996 turbo rears. I didn't initially want to fit spacers, but ended up needing them to achieve the look I wanted as the offsets were slightly higher than the originals so they would sit a little further inside the arches. They are 18 x 8 ET57 fronts and 18 x 11 ET51 rears.
In the end I fitted 15mm spacers to the front and 20mm to the rear. This gave me the equivalent of fitting 8mm spacers to the front and 14mm to the rears over the standard wheels. The spacers were from a company called Bimecc. They seem like really good quality items, and now they're fitted, the car drives and feels the same as before with no negative effects that I can detect. The wheels now sit in the arches where I'd like them to and I'm very happy with the new look.
DW 996turbo
Trainee
- Joined
- 23 Jul 2017
- Messages
- 77
Here's a few photos from a recent road trip I took with a few friends through mid and north Wales.
 by Dave W, on Flickr
 by Dave W, on Flickr
 by Dave W, on Flickr
 by Dave W, on Flickr
 by Dave W, on Flickr
 by Dave W, on Flickr
The trip was fantastic and the car performed faultlessly with no issues other than its huge thirst for super unleaded. The 997 has a sports system fitted so sounded awesome every time it went past. The BMW is a 650 so the V8 sounded pretty mean as well.
 by Dave W, on Flickr
 by Dave W, on Flickr
 by Dave W, on Flickr
 by Dave W, on Flickr
 by Dave W, on Flickr
 by Dave W, on Flickr
The trip was fantastic and the car performed faultlessly with no issues other than its huge thirst for super unleaded. The 997 has a sports system fitted so sounded awesome every time it went past. The BMW is a 650 so the V8 sounded pretty mean as well.
Jonathon555
Suzuka
- Joined
- 4 May 2014
- Messages
- 1,081
They work for me 
DW 996turbo
Trainee
- Joined
- 23 Jul 2017
- Messages
- 77
Hey Jon, thanks very much mate. :thumb:
Hope your still enjoying yours after getting it back.
Hope your still enjoying yours after getting it back.
DW 996turbo
Trainee
- Joined
- 23 Jul 2017
- Messages
- 77
One of my reasons for initially signing up to this forum and starting this thread, was to try and keep me motivated for this next project. This was the most ambitious modification I've attempted so far and at times, I felt I may have bitten off more than I could chew. I needed to try and stay motivated to keep spending hour after hour, slowly pushing the project forward.
I'm a big fan of the Cayman GT4 side intake scoops. I had also seen something similar briefly on the 991 GT2RS test mule. I was interested in trying to make something along those lines for my car. There was a guy in the states who was producing similar scoops for the 996 turbo, but their design wasn't quite to my personal tastes.
The technique I was using to make them was taken from a series of YouTube videos I'd seen by someone called Russell Dennis or 'STIGZ'. He makes one off custom fibreglass pieces of bodywork from scratch and after watching a few of his videos, I felt I could use those same techniques to build my own set of GT4 inspired side scoops. I'd had no prior experience working with these materials, but decided to give it a go anyway......
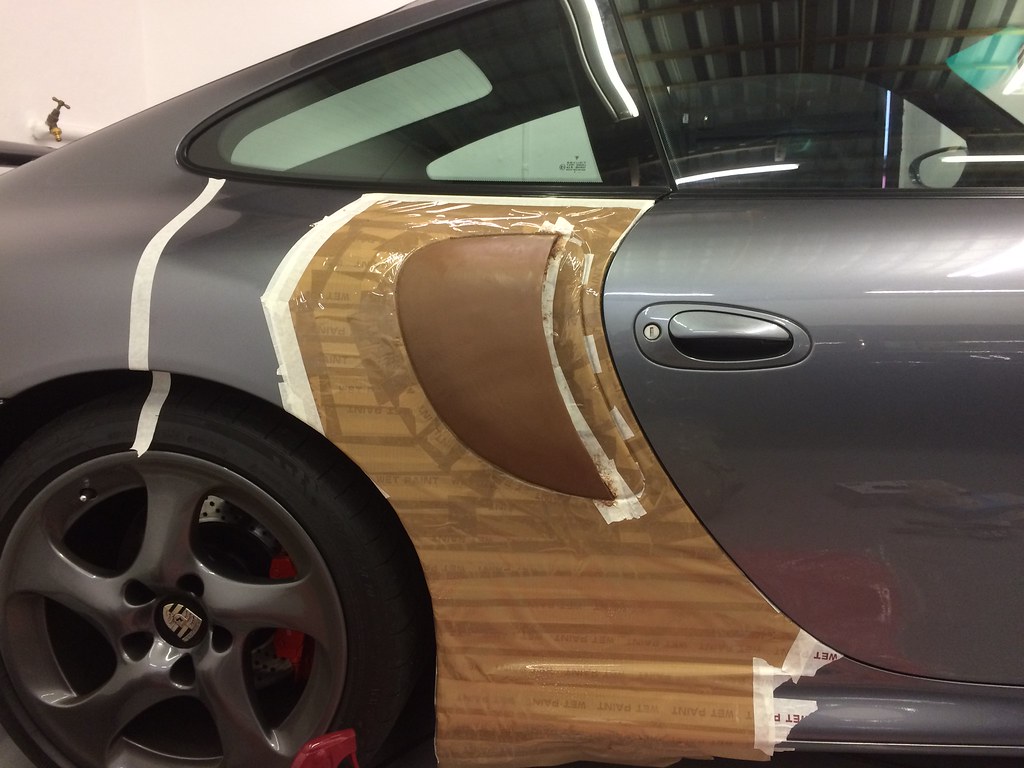
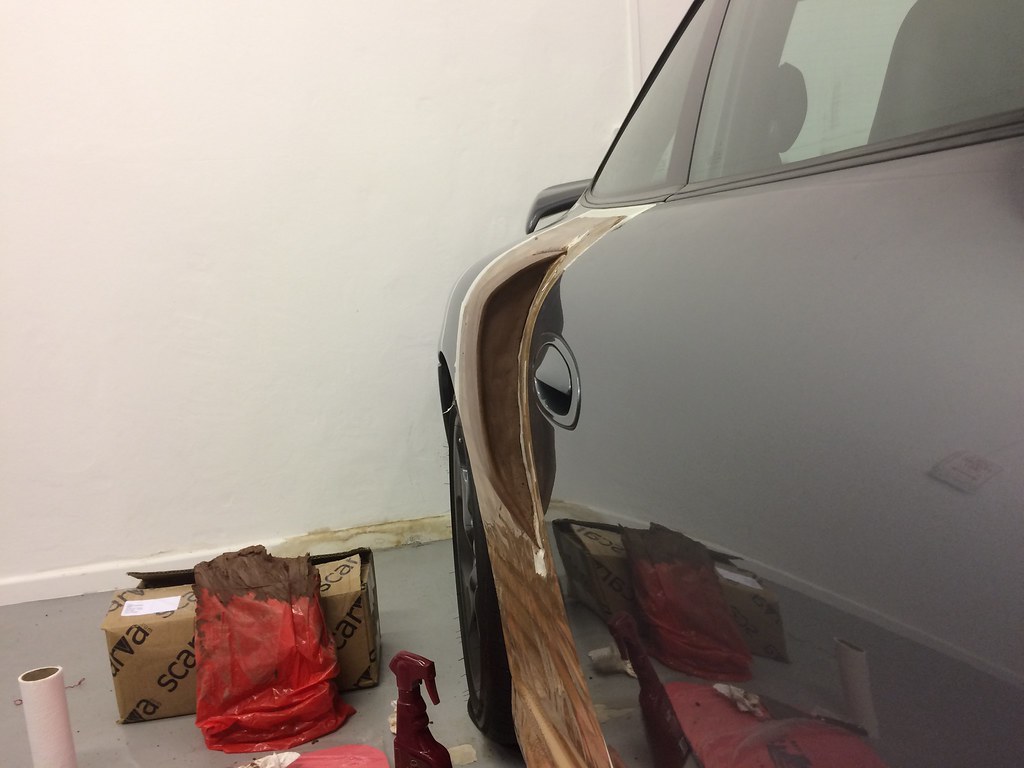
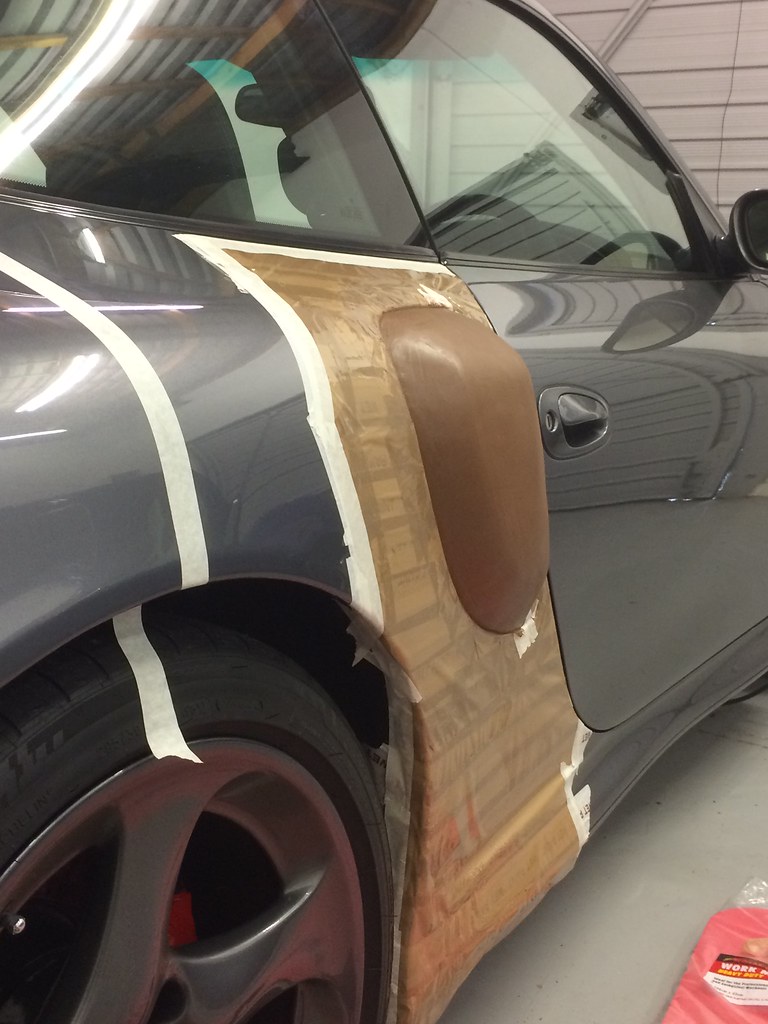
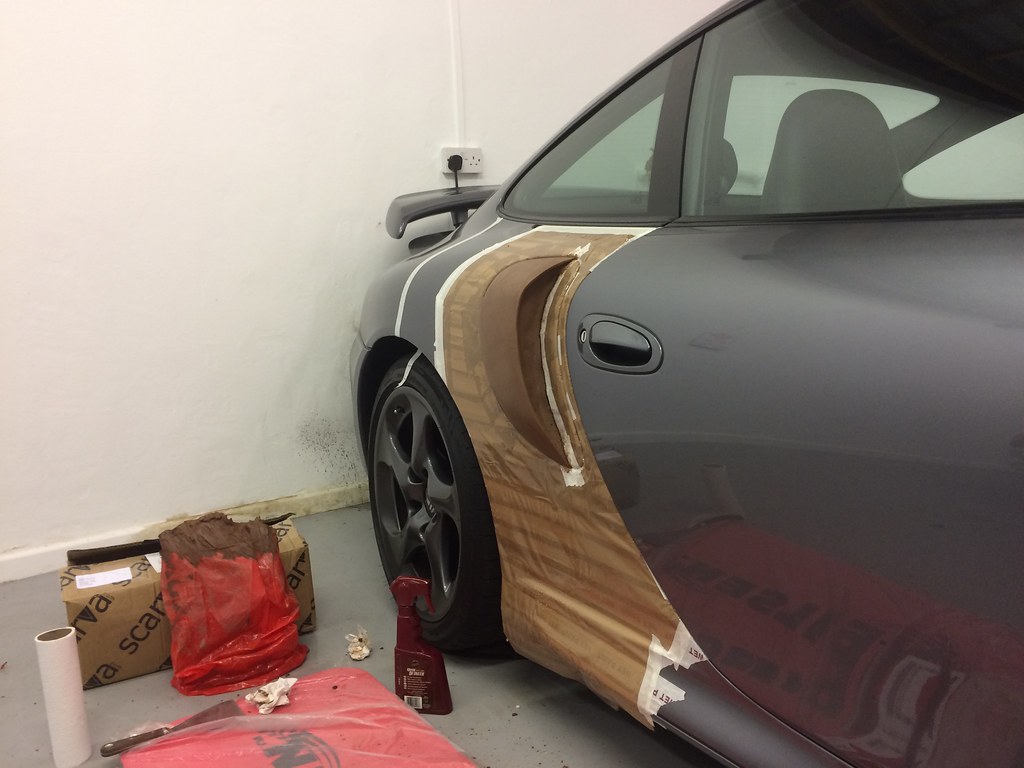
The first stage was to thoroughly mask the rear quarter panels and intakes so I didn't get any of the materials I was using on the paintwork. I also needed to then cover the masking tape layer with brown packing tape so that nothing would stick to the surface. The next phase was to start sculpting the shape of the scoop in potters clay. There were a few design ideas I wanted to try and incorporate into these side scoops. I wanted to try and have the front edge of the scoop mimic the line of the door edge in front of it. I also wanted to try and get as close as I could to mimicking the lines of the rear arches along the top of the scoops. It took a long time for me to be happy with the overall shape and to get the clay as smooth as I wanted it.
 Untitled by Dave W, on Flickr
 Untitled by Dave W, on Flickr
 Untitled by Dave W, on Flickr
 Untitled by Dave W, on Flickr
It's probably a good thing that I didn't realise at this stage, quite how much work would be involved in seeing this project through to the end.
I'm a big fan of the Cayman GT4 side intake scoops. I had also seen something similar briefly on the 991 GT2RS test mule. I was interested in trying to make something along those lines for my car. There was a guy in the states who was producing similar scoops for the 996 turbo, but their design wasn't quite to my personal tastes.
The technique I was using to make them was taken from a series of YouTube videos I'd seen by someone called Russell Dennis or 'STIGZ'. He makes one off custom fibreglass pieces of bodywork from scratch and after watching a few of his videos, I felt I could use those same techniques to build my own set of GT4 inspired side scoops. I'd had no prior experience working with these materials, but decided to give it a go anyway......
The first stage was to thoroughly mask the rear quarter panels and intakes so I didn't get any of the materials I was using on the paintwork. I also needed to then cover the masking tape layer with brown packing tape so that nothing would stick to the surface. The next phase was to start sculpting the shape of the scoop in potters clay. There were a few design ideas I wanted to try and incorporate into these side scoops. I wanted to try and have the front edge of the scoop mimic the line of the door edge in front of it. I also wanted to try and get as close as I could to mimicking the lines of the rear arches along the top of the scoops. It took a long time for me to be happy with the overall shape and to get the clay as smooth as I wanted it.
 Untitled by Dave W, on Flickr
 Untitled by Dave W, on Flickr
 Untitled by Dave W, on Flickr
 Untitled by Dave W, on Flickr
It's probably a good thing that I didn't realise at this stage, quite how much work would be involved in seeing this project through to the end.
DW 996turbo
Trainee
- Joined
- 23 Jul 2017
- Messages
- 77
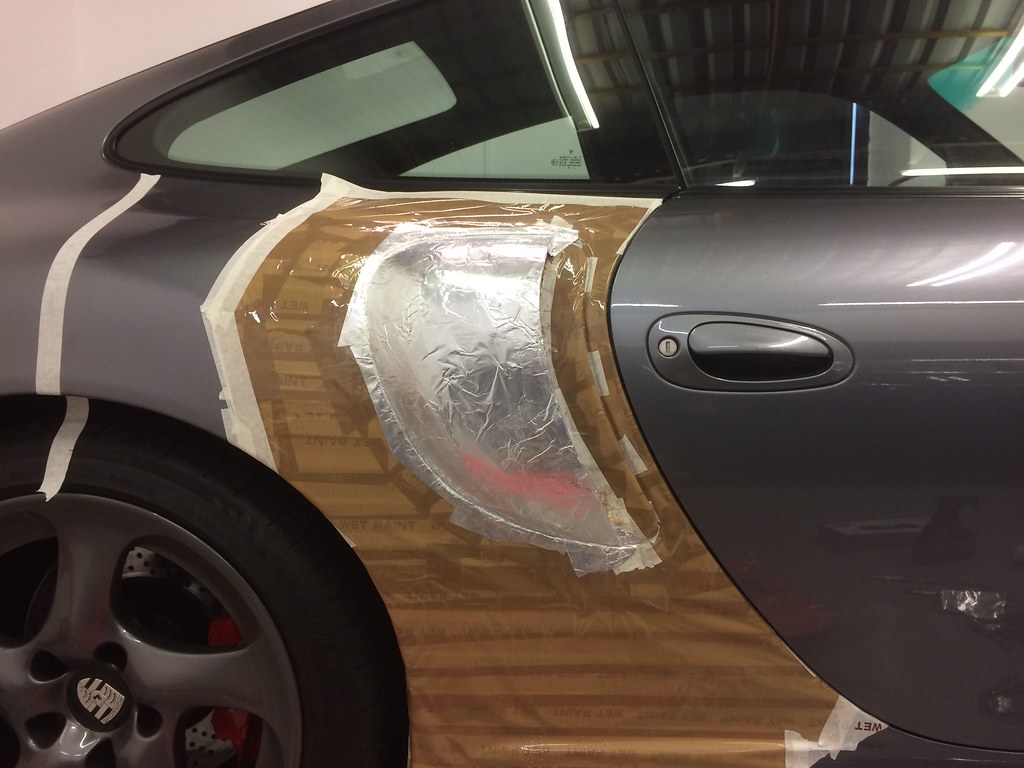
The next stage was to wet the clay and then cover it in tin foil. Once this was done, I had to cover the tin foil layer in sellotape. The tape is to stop anything sticking to the foil or the clay. At this stage I was able to get an idea of what the curves of the scoop would look like with a glossy surface.
 Untitled by Dave W, on Flickr
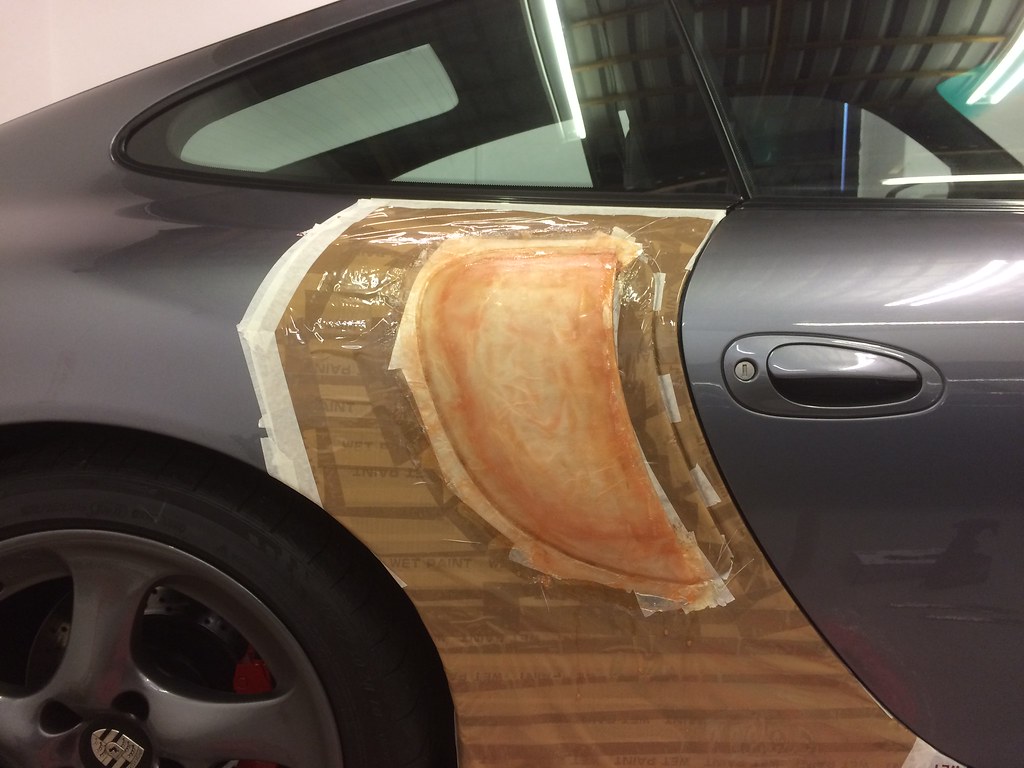
Next was the messy part. I then covered the scoop in two layers of fibreglass. I used 200gsm fibreglass cloth for this, as the cloth is apparently easier to lay over more complex shapes than the fibreglass mat. The resin I used was David's Fastglas resin from Halfords.
 Untitled by Dave W, on Flickr
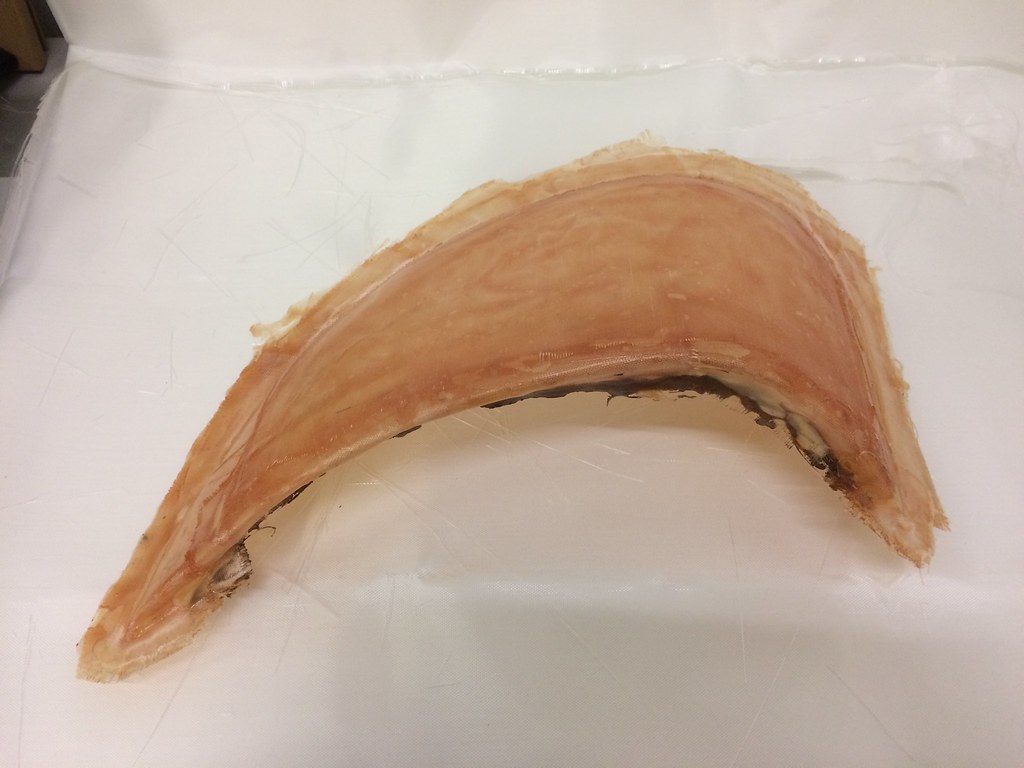
This was the first time I had worked with fibreglass and I found this stage a bit tricky. After leaving it for 24 hours it was ready to be removed from the car. It was more difficult to remove than I was expecting, but with a bit of patience it came off without any issues. The clay was then removed, but I left all of the masking tape in place. After all that hard work, I was left with this disastrous looking thing below.......
 Untitled by Dave W, on Flickr
Now that I had the basic shape of the scoop done, I had to reinforce it with a few more layers of fibreglass to stiffen it up. I added three more layers to the inside of the scoop and reattached it to the car while it was drying to help it maintain the correct shape. 24 hours later I had part of the scoop ready for the next stage.
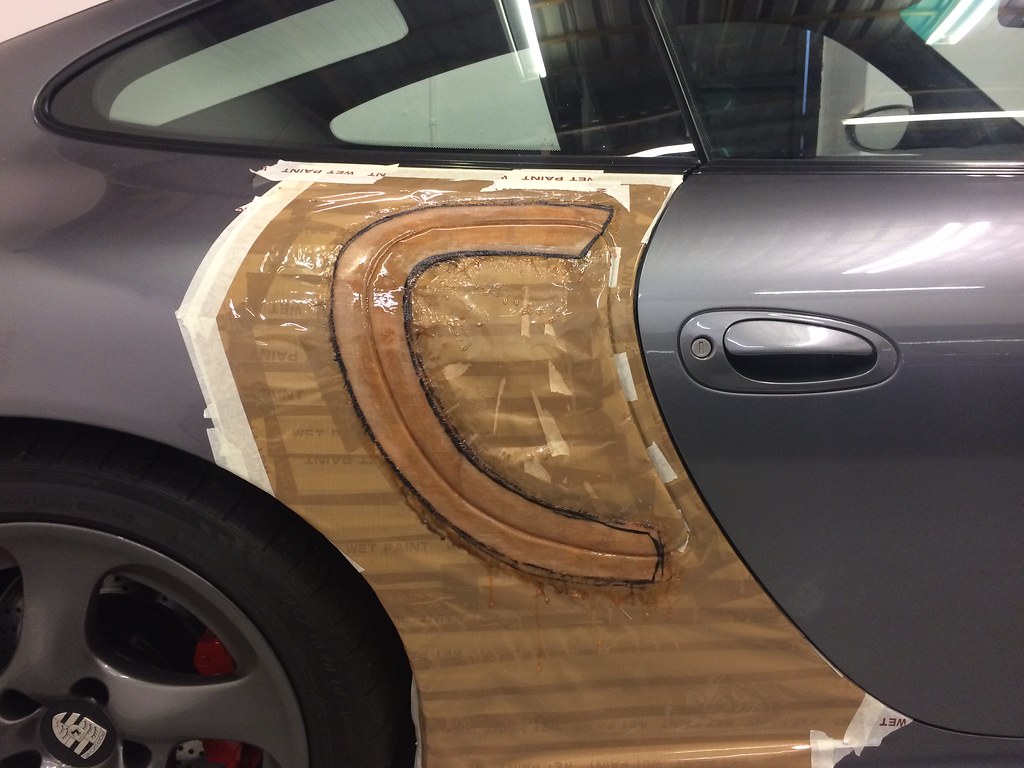
The other part would be the section that actually joins the scoop to the car. I'm sure there would've been better ways to do this, but I decided to create a 'C' shaped piece that I would bond to the outer scoop to allow me to have the outer edge of the scoop go all the way up to the rear quarter panel. Hopefully the pictures will do a better job of explaining what I mean by that.
 Untitled by Dave W, on Flickr
I used three layers of fibreglass for this. Once this piece was fully dry, I was able to remove it and all the masking tape and packing tape from the car. Thankfully, despite all the horrible and messy materials I'd been using, my paintwork survived.
 Untitled by Dave W, on Flickr
Next was the messy part. I then covered the scoop in two layers of fibreglass. I used 200gsm fibreglass cloth for this, as the cloth is apparently easier to lay over more complex shapes than the fibreglass mat. The resin I used was David's Fastglas resin from Halfords.
 Untitled by Dave W, on Flickr
This was the first time I had worked with fibreglass and I found this stage a bit tricky. After leaving it for 24 hours it was ready to be removed from the car. It was more difficult to remove than I was expecting, but with a bit of patience it came off without any issues. The clay was then removed, but I left all of the masking tape in place. After all that hard work, I was left with this disastrous looking thing below.......
 Untitled by Dave W, on Flickr
Now that I had the basic shape of the scoop done, I had to reinforce it with a few more layers of fibreglass to stiffen it up. I added three more layers to the inside of the scoop and reattached it to the car while it was drying to help it maintain the correct shape. 24 hours later I had part of the scoop ready for the next stage.
The other part would be the section that actually joins the scoop to the car. I'm sure there would've been better ways to do this, but I decided to create a 'C' shaped piece that I would bond to the outer scoop to allow me to have the outer edge of the scoop go all the way up to the rear quarter panel. Hopefully the pictures will do a better job of explaining what I mean by that.
 Untitled by Dave W, on Flickr
I used three layers of fibreglass for this. Once this piece was fully dry, I was able to remove it and all the masking tape and packing tape from the car. Thankfully, despite all the horrible and messy materials I'd been using, my paintwork survived.
Similar threads
- Replies
- 1
- Views
- 248
- Replies
- 6
- Views
- 612
New Threads
-
For Sale 997.2 C4 GTS PDK Convertible FOR SALE 37k Full OPC Hist Massive Spec
- Started by chrisboddy
- Replies: 0
-
-
For Sale 255/50/17 Goodyear Eagle F1 Asymetric 2 (pair) for sale
- Started by jerzybondov
- Replies: 0
-
-
-
Wanted Used PCCM Single Din
- Started by Adam_M
- Replies: 0
-
Porsche Model Range
Porsche 911
Porsche 992: 2018- Porsche 991: 2011-2019
 Porsche 997: 2004-2012
 Porsche 996: 1997-2005
 Porsche 993: 1993-1998
 Porsche 964: 1989-1993
 Porsche Carrera 3.2: 1983-1989
 Porsche Carrera SC: 1977-1983
 Porsche 930 Turbo: 1975-1989
 Porsche Early 911: 1964-1977

Porsche Hypercars
Porsche 918 Spyder Porsche Carrera GT
 Porsche GT1
 Porsche 959

Other Current Porsche Model
Porsche Taycan : (2019-0%) Porsche Macan : 2013-
 Porsche Panamera : 2009-
 Porsche Cayman: 2005-
 Porsche Cayenne: 2003-
 Porsche Boxster: 1997-

Porsche Legacy Models
Porsche 928 Porsche 968
 Porsche 944
 Porsche 924
 Porsche 914
 Porsche 912
 Porsche 904
 Porsche 550
 Porsche 356 Speedster
 Porsche 356


